DNS : Setting up MASTER SLAVE DNS setup with BIND
Setting up MASTER SLAVE DNS setup with BIND
In this tutorial we will discuss how we can create a master slave DNS server setup. In Master Slave DNS setup when a slave is created, it obtains an identical copy of all master records using zone transfer method. Master-slave have easy replication mechanism, as soon as a change is made on Master server, it notifies the slave & slave then fetches the data. All process taking mere seconds.
Scenario
Master server dns.ltechlab.com Slave server slave.ltechlab.com
IP address 192.168.1.100 IP address 192.168.1.110
We have already discussed how we can create a Master server. If you have not done that already, please do that by following this tutorial. We will then make some changes to Master server.
Configuring MASTER server
On master DNS, we will make changes to /etc/named.conf file to allow zone transfer to slave server & also to notify slave server when changes have been made to master.
Open /etc/named.conf & add the following lines
allow-transfer { localhost;192.168.1.110;};
this will allow the zone transfer to slave server. Next we will make changes to allow master to notify of changes made to slave server by adding following lines in named.conf only
zone “ltechlab.com” IN {
type master;
file “fwd.ltechlab.com.db”;
allow-update { none; };
notify yes;
also-notify { 192.168.1.110; };
};
type master;
file “fwd.ltechlab.com.db”;
allow-update { none; };
notify yes;
also-notify { 192.168.1.110; };
};
Here, notify yes & also-notify { 192.168.1.110; }; will allow notification to be sent to slave server (192.168.1.110) & slave will then fetch the updated information.
Next, we will update the slave DNS information in our forward zone file. Open “/var/named/ fwd.ltechlab.com.db” & make the following changes
$TTL 86400
@ IN SOA dns.ltechlab.com. root.ltechlab.com. (
2014112512 ;Serial
3600 ;Refresh
1800 ;Retry
604800 ;Expire
86400 ;Minimum TTL
)
;Name Server Information
@ IN NS dns.ltechlab.com.
Secondary Name server
@ IN NS slave.ltechlab.com.
;IP address of Name Server
primary IN A 192.168.1.100
;IP address of secondary server
secondary IN A 192.168.1.110
;Mail exchanger
ltechlab.com. IN MX 10 mail.ltechlab.com.
;A – Record HostName To Ip Address
www IN A 192.168.1.105
mail IN A 192.168.1.120
;CNAME record
ftp IN CNAME www.ltechlab.com.
After these changes are made, restart your BIND service for changes to take effect.
systemctl restart named.service
Configuring Slave server
Configurations on Master server are now complete, we will now configure our slave server to receive zone transfers from Master DNS. Firstly, we will install BIND on slave
$ yum install bind bind-utils
After the package has been installed, we will now edit /etc/named.conf . Open named.conf & comment the following lines
#listen-on port 53 { 127.0.0.1; };
#listen-on-v6 port 53 { :!! };
#listen-on-v6 port 53 { :!! };
Then we will add our network, to allow clients from our network to make query to DNS. So add the following line
allow-query { localhost;192.168.1.0/24; };
& lastly we will add a slave zone in configuration file
zone “ltechlab.com” IN {
type slave;
masters { 192.168.1.100; };
file “slaves/fwd.ltechlab.com.db”;
};
type slave;
masters { 192.168.1.100; };
file “slaves/fwd.ltechlab.com.db”;
};
Where, ltechlab.com – Domain name
slave – Secondary DNS
fwd.ltechlab.com.db – Slave forward lookup file

Now, restart BIND services on our slave
systemctl restart named.service
Verifying zone for Slave server
Lastly , we will verify our zone file with “dig command”, as we did for our master DNS server
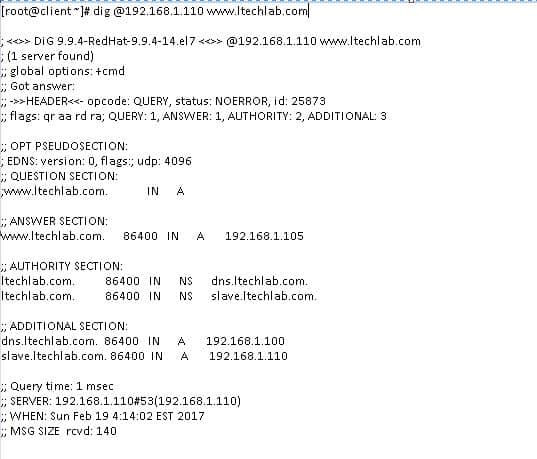
We now have our Master Slave DNS setup ready. Everytime we make an update to master, master will notify slave which in turn will fetch the update, thus keeping both master-slave in sync.


Comments
Post a Comment