Monitoring Server : Complete guide to install Zabbix on CentOS7
Complete guide to install Zabbix on CentOS7
Zabbix is open source monitoring software for servers, networks & applications. Zabbix offers real time monitoring of thousands of services for multiple operating systems like Windows, Linux etc & also supports monitoring of a number of networking devices.
Zabbix uses a server-client architecture with server installed on a separate machine & an agent application is than installed on all the client that are to be monitored. The connected clients than send the stats to Zabbix server at regular or pre-determined intervels. Zabbix uses a relational database to collect all the information provided by clients & present them to admins via Web UI in easy to understand, graphical format.
In this tutorial, we will learn to setup Zabbix monitoring server on CentOS 7 machine.
Pre-requisites
1 – We need to have LAMP server configured on the machine. To install LAMP server, please read our detailed article for installing LAMP SERVER ON CENTOS.
2 – We also need some extra PHP plugins installed. To install the required php plugin, open terminal & run the following command,
$ sudo yum install php-cli php-devel php-common php-pear php-gd php-mysql php-xml php-mbstring
Once we have completed the above mentioned pre-requisites, we can now move ahead with Zabbix installation,
Installation
To install zabbix, we will firstly have to add official Zabbix repository on our Centos 7 system. To do so, run
$ sudo rpm -Uv http://repo.zabbix.com/zabbix/3.4/rhel/7/x86_64/zabbix-release-3.4-1.el7.centos.noarch.rpm
After adding the repository, we will install the zabbix server, agent along with other necessary packages,
$ sudo yum install zabbix-server-mysql zabbix-web-mysql zabbix-agent zabbix-get zabbix-sender zabbix-java-gateway
Configuration
First thing that needs to be done after installing is to update the PHP time zone in the file ‘/etc/httpd/conf.d/zabbix.conf’.
$ sudo vim /etc/httpd/conf.d/zabbix.conf
& change the following parameter,
php_value date.timezone Asia/kolkata

Save the file & exit, then restart the httpd service to implement the changes made,
$ sudo systemctl restart httpd.service
Next thing to do is to create a database & database user for zabbix. To create a database & a user for the database, run the following commands,
$ mysql -u root -p
After enter the password for root that you have setup while configuring LAMP server. Once logged in, create a database using ,
MariaDB [(none)]> CREATE DATABASE zabbixdb CHARACTER SET utf8 COLLATE utf8_bin;
& then create username & grant access to ‘zabbixdb’ using following command,
MariaDB [(none)]> GRANT ALL PRIVILEGES ON zabbixdb.* TO zabuser@localhost IDENTIFIED BY “Zabbix@123”;
MariaDB [(none)]> FLUSH PRIVILEGES;
MariaDB [(none)]> exit
here, ‘zabuser’ is the name of the user for zabbixdb & ‘Zabbix@123’ is the password for database.
We will now export the default database that has been provided along with Zabbix, location for the database is ‘/usr/share/doc/zabbix-server-mysql-3.4.1/create.sql.gz’. Execute the following command to restore the database,
$ zcat /usr/share/doc/zabbix-server-mysql-3.4.3/create.sql.gz | mysql -uzabuser -p zabbixdb
you will than be asked for password for user ‘zabuser’, input the password & within couple of minutes, database will be restored. Next we need to specify database related information into the zabbix main configuration file, located at ‘/etc/zabbix/zabbix_server.conf’. Open the file
$ sudo vim /etc/zabbix/zabbix_server.conf
& mention the following information in the file,
DBHost=localhost
DBName=zabbixdb
DBUser=zabuser
DBPassword=Zabbix@123
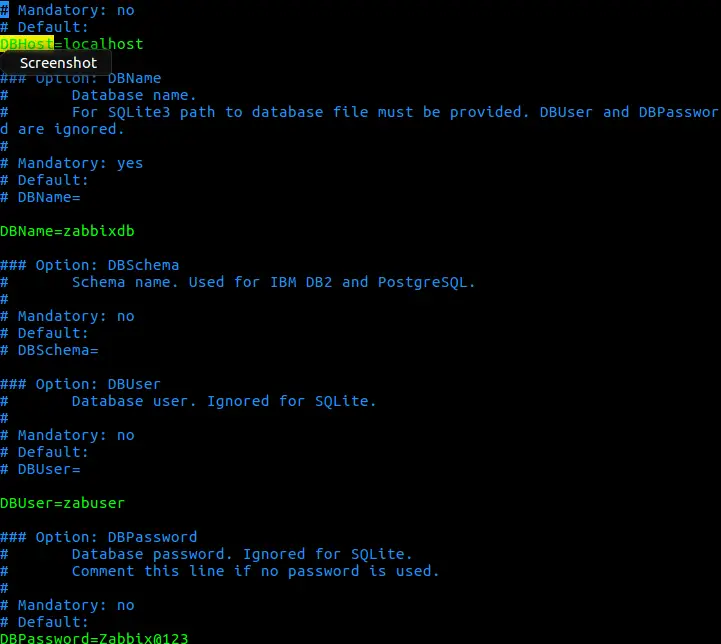
Save file & exit. Now start the zabbix server & zabix agent services, then also enable them at boot,
$ sudo systemctl start zabbix-server && systemctl start zabbix-agent
$ sudo systemctl enable zabbix-server && systemctl enable zabbix-agent
Next we will complete the zabbix configuration from Web UI.
Configuration via Web UI
We will now complete the zabbix installation using its web UI. To install zabbix, open a internet browser & enter the following URL in the address bar,
http://localhost/zabbix from local system, Or,
http://IP_Address/zabbix from a remote system
Now follow the screenshots mentioned below to configure the zabbix server,


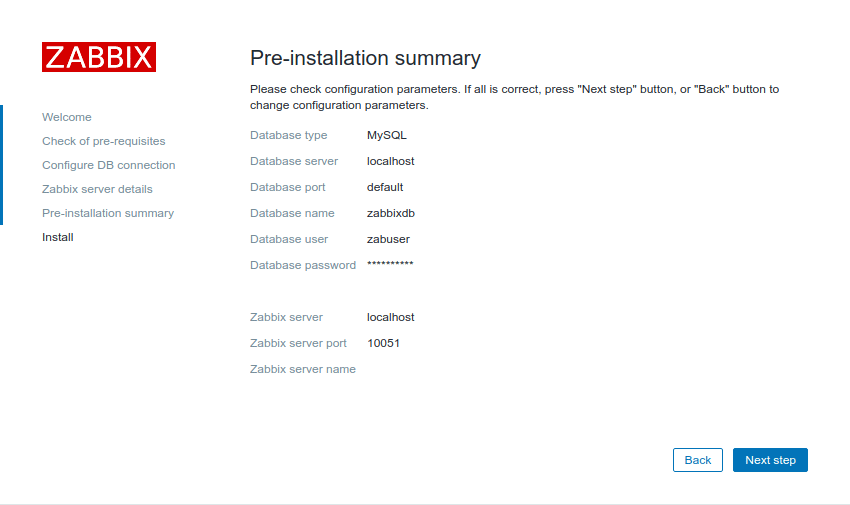

Installation of the zabbix is now complete & we will be directed to login page, default username is ‘Admin’ (Capital A) & password is ‘zabbix’. Login using the credentials, once logged in we can the dashboard for the zabbix.
It will be empty since we have not added any system for monitoring yet & zabbix server monitoring is disabled by default. To enable the zabbix server monitoring, goto CONFIGURATION –>> HOSTS . We should only see zabbix server as host, select it & click on ‘Disabled‘. It will now be enabled & we than see various monitoring parameters for zabbix server, various graph associated with the server in the monitoring tab.
This wraps up our tutorial on Ihow to install Zabbix server & configure it for monitoring the server/services.

Comments
Post a Comment